Going through the rainbow, let's start with red :D/FOTD

For a fun project I have decided to do wearable looks using brights going through the rainbow, so I started with red! ^_^
The battery was low on my camera so I couldn't make a tutorial, but I shall write out how I acheived this look for now! <3
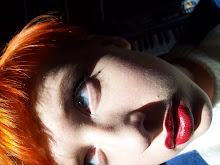
Naturally, I opted for an old school Hollywood glamour/Pin-up look!
I started out with a moisturiser to ensure my foundation went on smoothly then applied my concealer underneath my eyes (MAC studio Fix). At a MAC counter I was told never ever to do this, but I think it makes for an even, smoother finish in the end. I also applied it down my nose as a highlight.
I took my foundation (Also MAC studio Fix) and applied it quite liberally over my face and blended into my neck. I used a buffer brush to create a smooth, matte complexion.
Very lightly with a small brush I used a blusher underneath my cheekbones and blended it in. A good way to find where to contour is to suck in your cheeks, this will highlight your cheekbones; especially if you're baby-faced like me.
I applied an extremely thin amount of vaseline over my eyebrows, just a tiny film which would anchor the powder for the precise, defined eyebrows of this look.
Using a thin, angled brush(from the body shop, it's a nice firm brush which is ideal for precise, sharp brows), I took a dark brown pop eyeshadow and painted over my pale blonde eyebrows in a defined but believeable shape. I finished this off with a clear brow gel.
I applied a neutral base to my eyelid and added a skin coloured shimmery eyeshadow over my whole lid and used a slightly darker eyeshadow in the crease of my socket, to add a tiny bit more definition, this look doesn't need a whole lot of eyeshadow but it's fun to apply :D
At this point I applied lipbalm to prepare my lips for the lipstick later.
I then took a black liquid liner and drew my usual line across my lid, adding a flick at the outer corners. If black liquid eyeliner usually ends up messy i would use a gel liner instead, as it is possible to obtain more control.
I then added mascara :D
FOR THE LIPS :D
I applied an extremely thin layer of foundation over my lips for a base and lined my lips with Illamasqua 'spell' pencil. I then, very carefully so as not to smudge it, playboy(ugh, I know, but its good stuff) lipgloss in 'red manhattan'.
I used a gloss because it was very pigmented and gave a really nice plushy appearance, and is easier to wear through the daytime as it doesnt feel as heavy as a lipstick and gloss. A good option for pigmented lipglosses is illamsqua's intense lipglosses, although I have not tried them I have heard they are as pigmented as a lipstick.
Sorry about the lack of pictures in the tutorial, but tomorrow I have an orange and purple glittery youtube tutorial to upload to make up for it :D
posted by Liberty Von Hodes at
11:10
![]()

2 Comments:
Well done on a fantastic post - I love the way you incorporated lil mini reviews into the post as you went along! Love the look on you xxx
Thank you very much ^+^
Post a Comment
Subscribe to Post Comments [Atom]
<< Home